Back to Blog
Today we’re excited to announce the release of StandbyMP 12.2, delivering improved performance and.
By Product Specialist |
May 3, 2022 |
ASPICON, are a group of IT specialists who work with their customers to design tailor-made IT infrastructure for everything to do with databases. Over 600 organizations from sectors such as healthcare, automotive and IT already trust ASPICON's expertise. They recently created a blog reviewing Dbvisit StandbyMP. The original version was published in German, the translated version is below.
Dbvisit StandbyMP v11 – Tested for SQL Server!
At ASPICON, we have been using Dbvisit Standby products for many years to set up and operate highly available database infrastructures for our Oracle customers. With the introduction of "Standby MultiPlatform 11.x", Dbvisit now also offers a MultiPlatform approach that enables parallel use of both Oracle SE and Microsoft SQL Server.
We already published our first impressions in our last article "Dbvisit Standby Multiplatform v11 - we are excited", now we want to delve a little deeper, specifically into Standby for SQL Server. We put the software through its paces and for SQL Server we can already say: It’s well worth looking at!
Introduction
To get started, I’ll give a brief overview of how "Dbvisit StandbyMP" works, our test environment, and the necessary preparation steps. Then I’ll take a closer look at its use with SQL Server databases under Windows and Linux.
We will not go into detail about the installation of the SQL Server database software in this article. Instead, we will focus entirely on the configuration of Dbvisit StandbyMP.
Functionality
For SQL Server, the approach that Dbvisit has taken is based on the backup and restore of transaction log backups. In principle, this works in a similar way to Microsoft SQL Servers’ existing log shipping functionality.
However, in contrast to log shipping, StandbyMPs’ setup is fortunately much easier and faster, providing a decisive advantage.
Further, while switching back and forth with log shipping is a little challenging, with Dbvisit StandbyMP you can easily do failovers or planned switchovers - an automated switchover and switchback (if the database is to be operated on the former primary side again). And with Dbvisit the whole process can be easily set up with just a few clicks via a web interface.
Test environment
We have provided the following hosts for our test environment:
- 3 x Windows Server 2019 Standard
- 1 x Host for Control Centre
- 2 x hosts with SQL Server 2019 installed
- 2 x Oracle Enterprise Linux 8 (= similar to RHEL 8)
- 2 x hosts with installed SQL Server 2019 on Linux
Preparation
As a prerequisite, the machines mentioned above were prepared and the appropriate database software installed. The firewall was also adjusted on the Windows hosts. Corresponding inbound rules for the following ports were configured:
- DB Visit Control Centre
- 4433/TCP
- 5533/TCP - SQL Server host
- 1433/TCP
- 5533/TCP
- 7890/TCP
We obtained the software as a test version from the Dbvisit website (target platform and version of standby specified):

IMPORTANT: In order for everything to work on Windows systems, ensured that the corresponding service users are configured for the “Log on as a service” right in the “Local Security Policy” under “Local Policies” → “User Rights Assignment”.
Installation
Control Centre on Windows
After the software has been loaded, the installer for the Control Centre can simply be started on the relevant host. From our point of view, the installer is quite self-explanatory. You just have to make sure that you set an appropriate password and write it down in a safe place. This is also required for the agent installations in the next step.
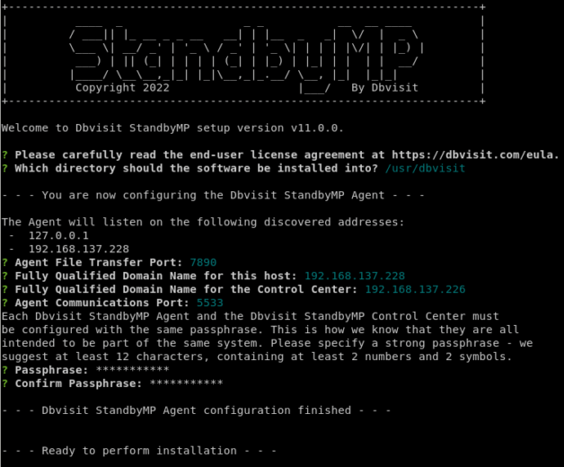
Installing the Agents on Windows
Installing the agents under Windows is just as easy as installing the Control Centre. The installation wizard guides you through the process step by step. Please note the information for the Fully Qualified Domain Name (FQDN) of the Control Centre and for the Agent Host (an IP address can also be specified here). The password that was already set in the Control Centre is required again at this point.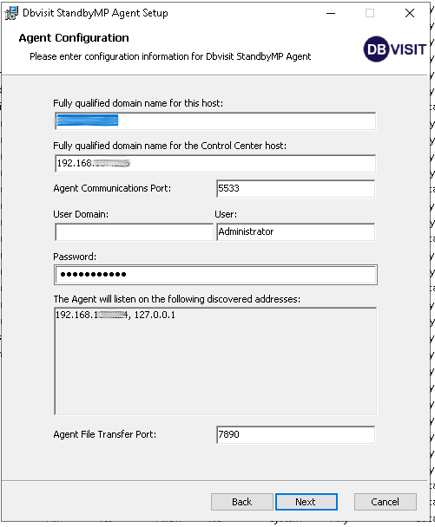
After the installation is complete, the Windows service will start. This is visible in the "services.msc".

Agents on Linux
Now let's look at installing the agents on Linux. In contrast to the installation of agents on Windows, a folder must be prepared on Linux systems before installation.
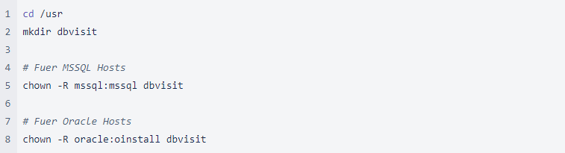
After that, the installer can be run from the shell:

As with Windows, a few details about the host and the Control Centre must then be entered.
After completing the steps described, this host should also appear in the Control Centre.
SQL Server databases on Windows
At this point let's look at the configuration and behavior of SQL Server standby databases on Windows.
To test this, we created a few empty databases. In order to be able to check whether the changes are properly transferred to the second side, we have also added a database with changeable content for replication. We created this database with the open-source tool HammerDB.
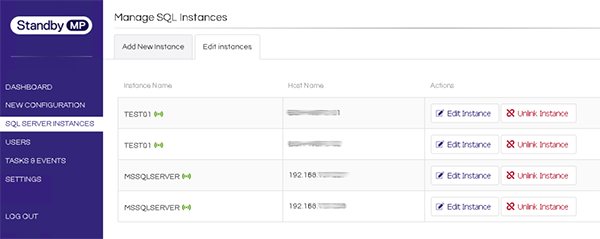
It is important that all databases are operated in full recovery mode. If the Dbvisit Standby Agent has been installed and all firewall rules set correctly, it will be displayed immediately in the Control Centre.
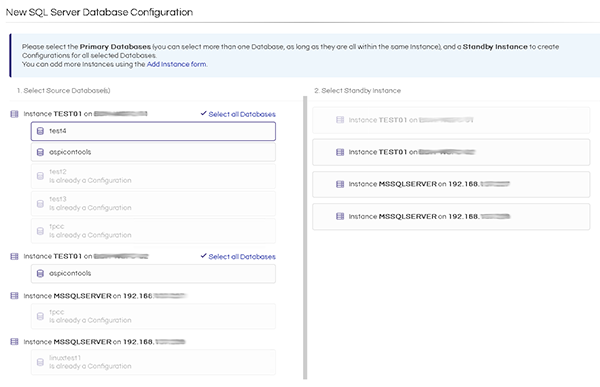
Creating a new standby configuration
To configure a new database for availability, one or more databases from an instance can be selected in the dashboard under “New Configuration”.
Once the target instance has been selected and all prerequisites are met the configuration can be initiated. StandbyMP performs these pre-checks in the background.
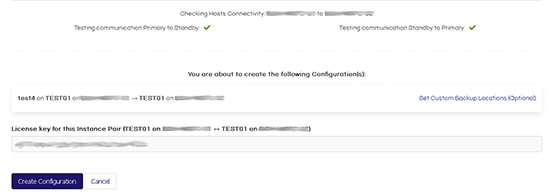
After the configuration has been created, it is visible in the dashboard. Disaster recovery can now be initiated here.

In the dialogue that then opens, all parameters for the synchronization can be confirmed. The paths for the backup files on both hosts and the storage locations of the database files on the target instance can be adjusted if necessary. If everything is set correctly, the process can be initiated by clicking the "Start" button.
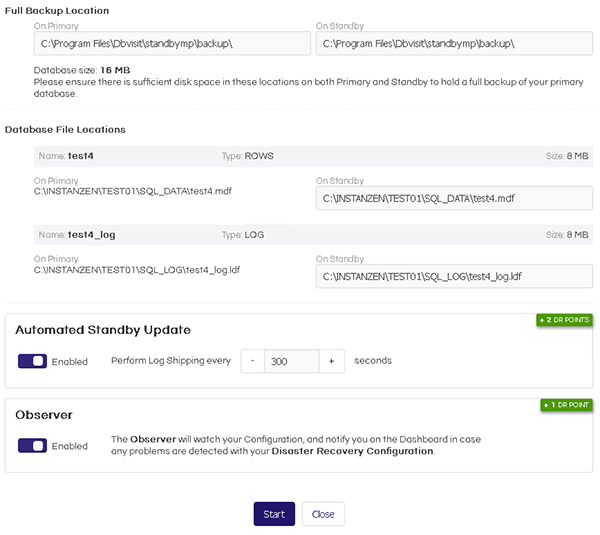
A complete backup of the database on the source instance is then created by the Dbvisit Agents and then restored on the target instance. The recovery leaves the database in RECOVERY mode so that transaction log backups are then imported.
Transaction log backups are regularly created on the source database and imported into the target database at a user specified interval. The current default value is 300 seconds, which is 5 minutes. But it can be customized as required.
Performing a (Graceful) Switchover
A switchover can be initiated easily via the dashboard.
Various actions can be selected via the “Actions” button of the respective database. Here is a view of the action drawer. 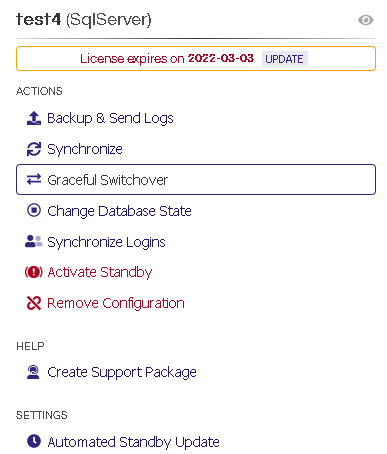
One of these options is "Graceful Switchover"
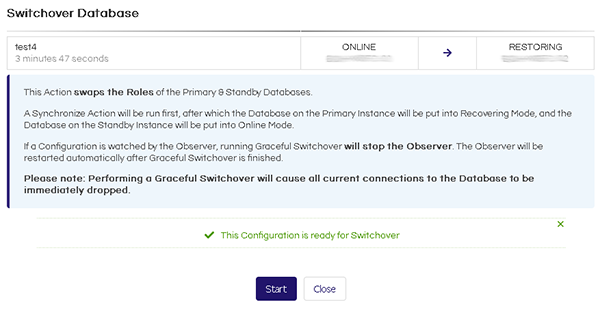
The switchover process is now initialized by pressing the “Start” button. After completing the process, the database on the former standby instance is active as primary and the database on the former primary instance is now running as standby in recovery mode. The regular transaction log backups are now imported in the opposite direction, i.e. on the new standby instance.
This is basically where we see the biggest advantage of Dbvisit Standby: In contrast to native log shipping from Microsoft SQL Server, Dbvisit Standby directly reverses the direction of synchronization so that availability is still guaranteed. With the native log shipping solution, some manual work would still be required to restore this state. With Standby you are also able to rollback with the click of a button and return to the initial state.
Performing Database Failover
When it comes to automated failover, opinions are always divided. While some do not want to lose any time in the event of an error, a large number of administrators would prefer to carry out such a process in a controlled manner or decide individually. Therefore, Dbvisit tends to follow the majority approach here, that the failover is not carried out automatically in the default setting. However, automated failover can be set accordingly if desired. The "Observer" component of Dbvisit is responsible for the failover. Observer monitors the accessibility of the databases and, if necessary, initiates the failover. If no automatic failover is set, the "Observer" can send appropriate notifications via Slack and email, or execution of a custom script.
The parameters of the “Observer” can be set individually. For example, you can set the check interval or the maximum number of attempts before an action is initiated.
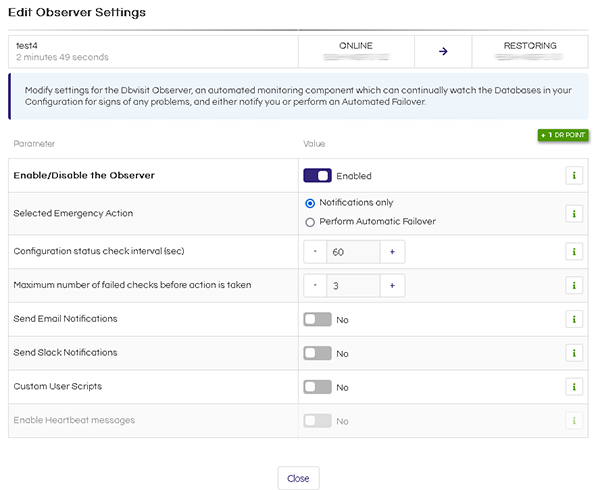
From our point of view, it is generally a sensible setting not to let the failover happen automatically if no corresponding load balancer configuration is implemented for the application.
SQL Server databases on Linux
The configuration and behavior of SQL Server databases under Linux is actually largely the same as SQL Server databases on Windows.
Once the agents have connected to the Control Center the databases can be configured. The only differences are the paths in the file system and that a login with a SQL Server login is recommended (if no Kerberos authentication is configured on the SQL Server on Linux).
IMPORTANT:
Dbvisit Standby currently supports the Linux distributions Oracle Enterprise Linux 6-8, Red Hat Enterprise Linux 6-8 and SUSE Linux Enterprise Server 11 and 12. Microsoft supports the distributions Red Hat Enterprise Linux 7.7 - 7.9 and 8.0 - 8.5, SUSE Linux Enterprise Server 12 and 15 and Ubuntu Linux 16.04, 18.04 and 20.04. This limits the choice to RHEL and SUSE Linux.
Concluding thoughts
Our conclusion for "Dbvisit StandbyMP" is clearly positive!
In addition to the simple operation and clear graphical user interface, the solution for SQL Server is particularly advantageous if the database hosts are operated in geographically different locations. Here the log shipping architecture combined with Dbvisits' compression makes it a good choice. Further, it is a convenient and secure Disaster Recovery solution that can be configured even on the SQL Server standard license.
But even if the database hosts are closer together the use of Dbvisit StandbyMP can still be beneficial. For example, if the effort to set up and maintain Basic Availability Groups (on SQL Server Standard license) is problematic, or if there is not a high requirement for a completely synchronized standby.
Written by Björn Ohlrich
Aspicon Gmbh
Tags: Disaster Recovery, Technical pieces, Review, SQL Server, Aspicon, featured