Back to Blog

Today we’re excited to announce the release of StandbyMP 12.2, delivering improved performance and.
By Vijayganesh Sivaprakasam |
August 13, 2021 |
How do I reconfigure my standby after a database upgrade?
Whether you're upgrading your database to a newer version or applying a patch there are only a few changes required to reconfigure Standby™️.
Standby™ is a powerful tool for creating and maintaining your Disaster Recovery database when running in Oracle Standard Edition.
It is easy to install and create the necessary components to get it going, but often we are asked a question “What should I do about my Dbvisit Installation when I upgrade my database from a lower version to a higher version or apply a patch?” In this blog I am going to explain how easy it is to reconfigure Standby™ with very few changes.
I chose to do a Database Upgrade from Oracle 11.2.0.4 to 12.2.0.1, below are my environment details:
Primary : testdb7@dbvlab03
Standby: testdb7@dbvlab01
Dbvisit Standby Version : 9.0.0.2
Dbvisit Standby Base: /usr/dbvisit

11.2 Binaries in Primary: /u01/app/oracle/product/11.2.0/db_1
11.2 Binaries in Standby: /u01/app/oracle/product/11.2.0/dbhome_1
12.2 Binaries in Primary and Standby: /u01/app/oracle/product/12.2
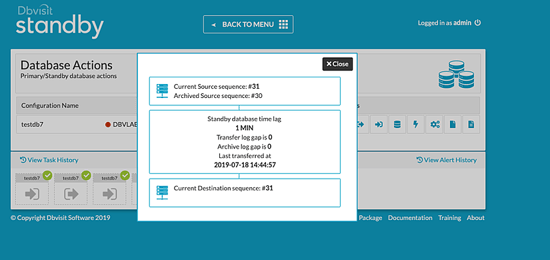
Log Gap Between Standby and Primary:
Pre-Upgrade Step:
oracle@dbvlab03[/home/oracle]: echo $ORACLE_SID
testdb7
oracle@dbvlab03[/home/oracle]: echo $ORACLE_HOME
/u01/app/oracle/product/11.2.0/db_1
oracle@dbvlab03[/home/oracle]: $ORACLE_HOME/jdk/bin/java -jar
/u01/app/oracle/product/12.2/rdbms/admin/preupgrade.jar FILE TEXT
Pre-upgrade generated files:
/u01/app/oracle/cfgtoollogs/testdb7/preupgrade/preupgrade.log
/u01/app/oracle/cfgtoollogs/testdb7/preupgrade/preupgrade_fixups.sql
/u01/app/oracle/cfgtoollogs/testdb7/preupgrade/postupgrade_fixups.sql
Upgrade Process:
oracle@dbvlab03[/home/oracle]: id
uid=501(oracle) gid=501(oinstall) groups=501(oinstall),502(dba),503(oper),504(asmadmin),505(asmdba),
507(backupdba),508(dgdba),509(kmdba)
oracle@dbvlab03[/home/oracle]: export ORACLE_HOME=/u01/app/oracle/product/12.2
oracle@dbvlab03[/home/oracle]: export PATH=$ORACLE_HOME/bin:$PATH
oracle@dbvlab03[/home/oracle]: cd /u01/app/oracle/product/12.2/bin
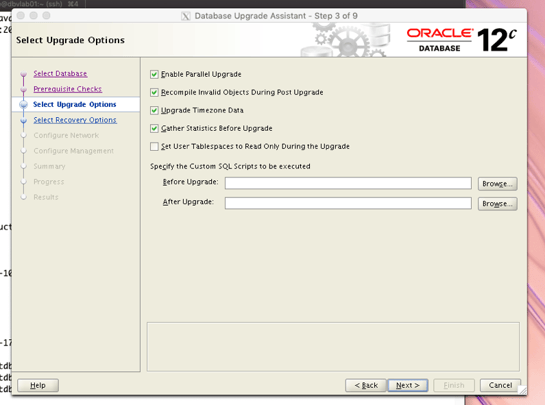
oracle@dbvlab03[/u01/app/oracle/product/12.2/bin]: ./dbua

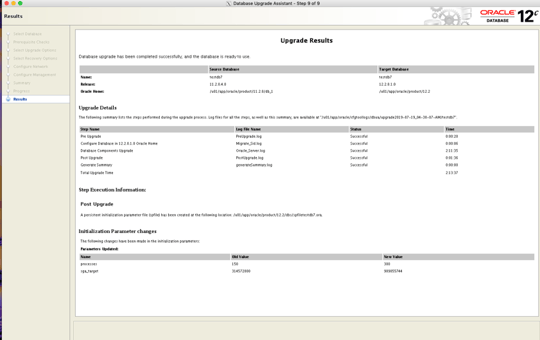
Upgrade Successful:
SQL> select name,open_mode from v$database;

NAME    OPEN_MODE
--------- --------------------
TESTDB7   READ WRITE

SQL> select * from v$version;
BANNER                                                                                         CON_ID
-------------------------------------------------------------------------------- ----------

Oracle Database 12c Enterprise Edition Release 12.2.0.1.0 - 64bit Production                     0
PL/SQL Release 12.2.0.1.0 - Production                                                           0
CORE   12.2.0.1.0        Production                                                              0
TNS for Linux: Version 12.2.0.1.0 - Production                                                   0
NLSRTL Version 12.2.0.1.0 - Production                                                           0
Once the upgrade process is completed, let’s move on to see what needs to be done from Standby™'s perspective.
1. Stop the standby database
oracle@dbvlab01[/usr/dbvisit/standby]: ./dbvctl -d testdb7 -o stop
=============================================================
Dbvisit Standby Database Technology (9.0.02_0_gbd40c486) (pid 20822)
dbvctl started on dbvlab01: Fri Jul 19 07:22:46 2019
=============================================================

Stopping instance testdb7...
Standby Database testdb7 shutdown successfully on dbvlab01.

=============================================================
dbvctl ended on dbvlab01: Fri Jul 19 07:22:49 2019
=============================================================

oracle@dbvlab01[/usr/dbvisit/standby]:
2. Change the /etc/oratab entry to point to the new home
oracle@dbvlab01[/usr/dbvisit/standby]: cat /etc/oratab |grep testdb7
testdb7:/u01/app/oracle/product/12.2:N # line added by Agent
oracle@dbvlab01[/usr/dbvisit/standby]:
3. Now login to the Primary database server (dbvlab03) and go to /usr/Dbvisit/standby/conf and change the ORACLE_HOME and ORACLE_HOME_DR to new ORACLE_HOME directory
oracle@dbvlab03[/usr/dbvisit/standby/conf]: cat dbv_testdb7.env  |grep ORACLE_HOME
# ORACLE_HOME         - ORACLE_HOME location
ORACLE_HOME = /u01/app/oracle/product/12.2
# ORACLE_HOME_DR      - ORACLE_HOME location on standby server
ORACLE_HOME_DR = /u01/app/oracle/product/12.2
oracle@dbvlab03[/usr/dbvisit/standby/conf]:
4. Copy the modified configuration of the DDC to the standby using the below command
oracle@dbvlab03[/usr/dbvisit/standby]: ./dbvctl -d testdb7 -c
=============================================================
Dbvisit Standby Database Technology (9.0.02_0_gbd40c486) (pid 28901)
dbvctl started on dbvlab03: Fri Jul 19 07:05:33 2019
=============================================================

>>> Dbvisit Standby configuration copied to dbvlab01...

=============================================================

dbvctl ended on dbvlab03: Fri Jul 19 07:05:40 2019
With the above we have completed all the steps that are required from Standby™ but the steps below must be done from the database:
Before starting the standby database the spfile has to be modified and copied to the new ORACLE_HOME/dbs location.
SQL> create pfile='/u01/app/oracle/product/12.2/dbs/inittestdb7.ora' from
spfile='/u01/app/oracle/product/11.2.0/dbhome_1/dbs/spfiletestdb7.ora';

File created.

Opened the pfile(inittestdb7.ora) and modified the compatible parameter to 12.2.0.1 and
then logged back in by setting the new ORACLE_HOME for testdb7.

SQL> create spfile from pfile='/u01/app/oracle/product/12.2/dbs/inittestdb7.ora';

File created.

SQL> startup nomount
ORACLE instance started.

Total System Global Area          314572800 bytes
Fixed Size                        8620224 bytes
Variable Size                     234882880 bytes
Database Buffers                  67108864 bytes
Redo Buffers                      3960832 bytes
SQL> alter database mount;
Database altered.
1. Now let's send and apply archivelogs. You can either use Standby™'s Graphical User Interface (GUI) to do it or use the Command Line Interface (CLI).
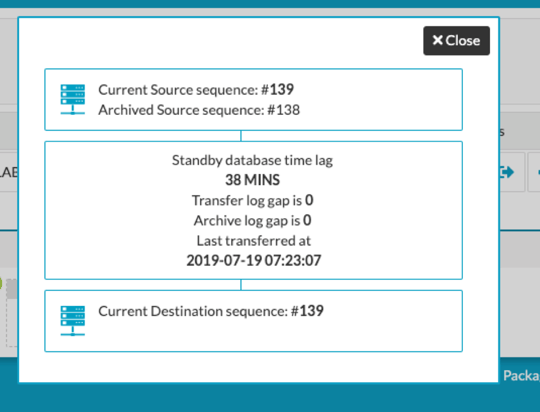
2. Log gap report after the send/apply
From the above steps you can see how easy it is to reconfigure Standby™ when upgrading your database from Oracle Database 11.2 to 12.2. For more information, please contact us.