Back to Blog

Getting Started with RMAN backups and Oracle 19c
Update: This blog is an updated version of the.


In Part 1 we looked at how to refresh a development database on a different server using Standby™️'s Snapshot Option and the RMAN Duplicate command. Part 2 expands this using Ansible® to perform the refresh actions.

Rapid database refresh using RMAN Duplicate and Dbvisit Snapshots
In Part 1 of this series, we looked at how to refresh a development database on a different server using Standby™️’s Snapshot Option coupled with the RMAN Duplicate command.
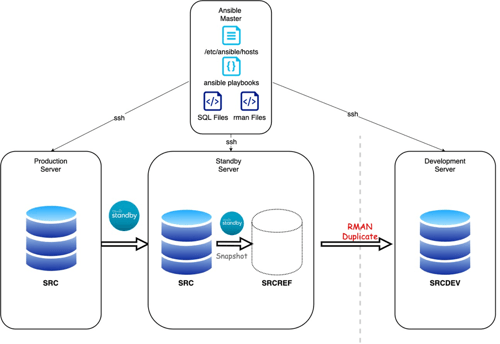
Part 2 expands this by leveraging the popular configuration and orchestration tool Ansible® to perform the refresh actions. Our configuration diagram is simply altered to contain the Ansible Master host. Here all the SQL and RMAN scripts, as well as the Ansible playbooks, are stored.
For the purpose of this blog, our Ansible master has a very simple installation and is hosted in AWS. Therefore, for ease, the Ansible user has been configured to be the EC2-user native to the Amazon instances. On Amazon Linux 2, the install is very straightforward:
sudo amazon-linux-extras install ansible2
sudo vi /etc/ansible/hosts
The host configuration is located in the default /etc/ansible/hosts file and we have only 3 servers in our setup: The Primary, Standby and Development servers. With the server names and IP addresses located in the server /etc/hosts file, we can configure the Ansible host’s file to have:
[ec2-user@ip-10-0-2-185 ~]$ cat /etc/ansible/hosts
# This is the default ansible 'hosts' file.
#
# It should live in /etc/ansible/hosts
[db_primary]
prim
[db_standby]
stby
[db_dev]
dev
Naturally, each of these servers are accessible via SSH keys and this can be seen in this short test:
[ec2-user@ip-10-0-2-185 ~]$ ansible all --module-name command --args "hostname -f"
dev | CHANGED | rc=0 >>
ip-10-0-1-58
stby | CHANGED | rc=0 >>
ip-10-0-1-187
prim | CHANGED | rc=0 >>
ip-10-0-1-183
[ec2-user@ip-10-0-2-185 ~]$
In order to suppress the python interpreter warnings I have the environment variable:
export ANSIBLE_PYTHON_INTERPRETER=auto_silent set in the ec2-user .bash_profile
The scripts used in this post are:
[ec2-user@ip-10-0-2-185 ~]$ tree

.
├── dbv-playbook.yml
├── rman
│   └── rman_dup.rmn
├── snap-ref-playbook.yml
└── sql
    ├── create_spfile.sql
    ├── drop_db.sql
    └── start_db.sql

2 directories, 6 files
[ec2-user@ip-10-0-2-185 ~]$
And we will begin with testing the Dbvisit commands in a small playbook that runs a send/apply of logs then checks the log gap status. This tests the validity of performing different tasks on each host.
The “send logs” snippet from the dbv_playbook.yml is below:
[ec2-user@ip-10-0-2-185 ~]$ cat dbv-playbook.yml
---
- hosts: db_primary
  gather_facts: false
  vars:
    dbvisit_utl: /usr/dbvisit/standby
    ddc: SRC
  become: yes
  become_user: oracle
  tasks:

  - name: send logs
    shell: /usr/dbvisit/standby/dbvctl -d
    register: send_output
If we want to see the output of the command, we can use the -debug and .stdout_lines of the variable registered e.g. - debug: var=log_gap.stdout_lines
In the dbv_playbook.yml, the log-gap task is output in this way. We run the playbook by using the ansible-playbook command.
[ec2-user@ip-10-0-2-185 ~]$ ansible-playbook dbv-playbook.yml
Now that we have confirmed that basic Dbvisit commands are able to be successfully run in this environment, we can build up the snap-ref-playbook.yml with the tasks needed to perform the duplicate. In summary these tasks are:
 - name: create snapshot
    shell: |
      export PATH=$PATH:
      dbvsnap -d  -sname  -j .json -csnap
    register: cr_snap_output
  - debug: var=cr_snap_output.stdout_lines
- name: Start  DB in nomount mode
    shell: |
      export ORACLE_SID=
      export ORACLE_HOME=
      cd $ORACLE_HOME/dbs ; mv spfile.ora spfile.ora.bdk
      echo "db_name=" > init.ora
      /bin/sqlplus -s "/ as sysdba" @/home/oracle/scripts/start_db.sql
    register: sqloutput_startdb
connect target sys/kiwi123@'&1'
connect auxiliary sys/kiwi123@'&2'
duplicate database to '&2'
  from active database
  using backupset
  spfile
  parameter_value_convert ('&1','&2')
   set db_file_name_convert='/usr/dbvisit/standby/snap/SRC/&1/data/SRC/','/u02/app/oracle/oradata/&2/'
   set log_file_name_convert='/usr/dbvisit/standby/snap/SRC/&1/data/SRC/','/u02/app/oracle/oradata/&2/'
   set control_files='/u02/app/oracle/oradata/&2/control01.ctl', '/u02/app/oracle/fra/&2/control02.ctl'
   set db_recovery_file_dest='/u02/app/oracle/fra/'
   set audit_file_dest='/u02/app/oracle/oradata/&2/adump'
   set DB_NAME='&2'
NOFILENAMECHECK;
- name: Perform duplicate
    shell: |
      export ORACLE_SID=
      export ORACLE_HOME=
      /bin/rman @/home/oracle/scripts/rman_dup.rmn USING  ;
    register: count_dup
    failed_when: count_dup.stdout != 1
- name: drop snapshot
    shell: |
      export PATH=$PATH:
      dbvsnap -d  -dsnap -sname
    register: del_snap_output
  - debug: var=del_snap_output.stdout_lines
Let’s now run the playbook to refresh the database SRCDEV on host db_dev.
[ec2-user@ip-10-0-2-185 ~]$ ansible-playbook snap-ref-playbook.yml
PLAY [db_standby] ***********************************************************
TASK [create snapshot] ***********************************************************
ok: [dev]
TASK [debug] ***********************************************************
ok: [stby] => {
    "cr_snap_output.stdout_lines": [
        "========================================================",
        "Standby™️ Database Technology (9.0.12_0_g1268187) (pid 9815)",
        "Dbvisit Snapshot (pid 9815)",
        "DBVSNAP started on ip-10-0-1-187: Fri May  8 20:52:47 2020",
        "========================================================",
        "",
        "Snapshot SRCREF created ",
        "",
        "========================================================",
        "DBVSNAP ended on ip-10-0-1-187: Fri May  8 20:52:55 2020",
        "========================================================="
    ]
}
TASK [check Snapshot is created] ***********************************************************
ok: [dev]
TASK [copy spfile file from remote to local.] *****************************************************
ok: [stby]
TASK [Switch to spfile from pfile] ***********************************************************
ok: [dev]
PLAY [db_dev] ***********************************************************
TASK [copy drop db file from remote to local.] ****************************************************
ok: [dev]
TASK [copy start db file from remote to local.] ***************************************************
ok: [dev]
TASK [Drop Exisiting DB] ***********************************************************
ok: [dev]
TASK [check Database is dropped] ***********************************************************
ok: [dev]
TASK [Start SRCDEV DB in nomount mode] ***********************************************************
ok: [dev]
TASK [copy rman file from remote to local.] *******************************************************
ok: [dev]
TASK [Perform duplicate] ***********************************************************
ok: [dev]
PLAY [db_standby] ***********************************************************
TASK [drop snapshot] ***********************************************************
ok: [dev]
TASK [debug]
***********************************************************
ok: [stby] => {
    "del_snap_output.stdout_lines": [
        "========================================================",
        "Standby™️ Database Technology (9.0.12_0_g1268187) (pid 11129)",
        "Dbvisit Snapshot (pid 11129)",
        "DBVSNAP started on ip-10-0-1-187: Fri May  8 20:56:13 2020",
        "========================================================",
        "",
        "Snapshot SRCREF deleted. ",
        "",
        "========================================================",
        "DBVSNAP ended on ip-10-0-1-187: Fri May  8 20:56:19 2020",
        "========================================================="
    ]
}
TASK [check Snapshot is dropped] ***********************************************************
ok: [dev]
PLAY RECAP ****************************************************************************************
dev      : ok=7    changed=4    unreachable=0    failed=0    skipped=0    rescued=0    ignored=0
stby     : ok=8    changed=5    unreachable=0    failed=0    skipped=0    rescued=0    ignored=0
[ec2-user@ip-10-0-2-185 ~]$
A quick check on the DEV database reveals that the refresh has indeed been successful.
This short blog series has served to prove not only how simple it is to refresh a database taken ‘on-demand’ using Reporting Replicas and Test/Dev Snapshots, but how the entire process can be orchestrated to be easily repeated time and time again.