Back to Blog
Why Azure?
Azure is one of the largest cloud providers in the world, along with providing a wide.


We'll create both primary and standby database servers in AWS using Oracle Linux EC2 instances, running Oracle Database 11g Release 2 SE with Standby™.

This post is a follow on from the “Oracle Disaster Recovery in the Cloud – Part 1”.
In this post I will be showing you an example where I will create both primary and standby database servers in AWS using Oracle Linux EC2 instances running Oracle Database 11g Release 2 Standard Edition One with Standby for standby management. As mentioned in part 1, there is more than one way to go about getting an environment built in the Amazon cloud. You can use a few EC2 instances using public IP addresses which make use of Elastic IPs, or you can look at using a more private isolated environment using Amazon Virtual Private Cloud (VPC) with more flexibility using your own network address range - in effect, creating your own little private network in the cloud. For more details on VPC please follow this link. As with most things in IT, I always recommend starting simple, keeping it basic, then once you are more familiar with the technologies and options you can expand from there and make things more complex.
Once you have created your AWS account login, navigate to the “AWS Management Console”. The Console will load and you will see the extensive range of Amazon Web Services available to you. I do encourage you to read up about some of these services as many are truly useful and may suit your needs and requirements. I will focus on the EC2 service in this post. When you select the “EC2 (Servers in the cloud)” option you will be presented with the Amazon EC2 Console Dashboard.
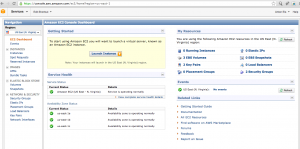
Amazon EC2 Dashboard Example
I found that the dashboard is easy to use and navigate. It is important to note that when talking about “Instances” when working with the EC2 dashboard, we are talking about Virtual Machines.
Now the overall structure we are going to build is the following:
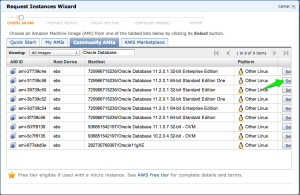
One of the great things about AWS is that there are a large number of “pre created” machine images, referred to as Amazon Machine Images (AMI), available to make it easy for you to quickly establish a new environment. For more details about these images see https://aws.amazon.com/amis.
In the next section I will provide you with the high level steps you need to follow to establish an environment running Standby managing an Oracle 11g Standard Edition One standby database environment using Amazon EC2.
The Steps can be summarized as follows:
ssh –i aws_key.pem root@<elastic_IP_address_here>
Note: Remember that when you shutdown an EC2 instance, the Elastic IP address that was assigned to it will be removed, meaning it will lose its association with that particular instance. When you just perform a restart (reboot) of the instance, it will not lose it. So if you do shutdown your instances and start them up later, you will have to associate the Elastic IP addresses again. There are a few other options available, for example when using a VPC (Virtual Private Cloud), but I will not go into that in this post.
We are now getting to the stage where you need to perform the pre-requisites for installing Standby. I will cover 3 of these steps, which I think are important, and will make the installation process much easier going forward.
Now at this stage you should have two instances running, but they don’t know about each other, and you will notice that their default hostnames (run the “hostname” command from the command line) are made up of the internal DHCP IP address that is assigned. Something like this:# hostname
ip-10-194-237-163
Before you install Standby there are still more steps to perform. Now as you have allocated two Elastic IP’s (EIPs) and assigned them to the primary and standby server, you can use the EIP’s public DNS name going forward which can be something like: ec2-154-243-183-73.compute-1.amazonaws.com. But to me this is not that user friendly.
I know there are more options, and you are welcome to investigate and use these. But for this demo install, to enable more user friendly names, I add two entries to my local /etc/hosts files on both systems, where I assign each of the EIPs to the hostnames I will be using.
For example I have 2 x EIP’s one assigned to the primary hostname and the second to the Standby hostname. So in my example I end up with these two entries in both my Instance’s /etc/hosts file (please note the IP’s below will need to be replaced with your Elastic IP’s, these are just examples).
154.243.183.95    dbvaws01
154.243.183.97    dbvaws02
Note: There are other options available, such as using DNS etc. You are welcome to try these options out. To ensure that Standby is making use of these more meaningful names "dbvaws01" and "dbvaws02" we need to create what we call a hostname command script or HOSTNAME_CMD script.
This script is executed by Standby to get the correct hostname to use. This is used to bypass the default "hostname" but to use the one you would like to use. This name needs to be resolvable to an IP address. And in this case we have already added the two entries above to two instances' /etc/hosts files.
I now create a script in /usr/local/bin/ called "dbv_host" and make sure it is executable (chmod a+rx dbv_host). The only thing this script needs to do is echo back the hostname you would like to use for that server.
Examples below:
On the primary server which will be "dbvaws01" I have this:
[/usr/local/bin] # ls -al dbv_host
-rwxr-xr-x 1 root root 31 Oct 16 22:45 dbv_host
[/usr/local/bin] # cat dbv_host
#!/bin/bash
echo "dbvaws01"
On the standby server which will be "dbvaws02" I have this:
[/usr/local/bin] # ls -al dbv_host
-rwxr-xr-x 1 root root 31 Oct 16 22:45 dbv_host
[/usr/local/bin] # cat dbv_host
#!/bin/bash
echo "dbvaws02"
Now when you execute these scripts it just returns one line, which is the hostname you want to use. Example if executed on the primary I get the following:
[/usr/local/bin] # ./dbv_host
dbvaws01
[/usr/local/bin] #
Now it is important that once you have finished running the initial dbvisit setup process to create the DDC file you need to update the DDC file to make sure that the parameter HOSTNAME_CMD=/usr/local/bin/dbv_host Tip: Another thing you can do to make sure it is easy to see which system you are on is to update the root and oracle Unix account PROMPT, which can be achieved by modifying the PS1 environment variable to something like this:
PS1="`whoami`@`dbv_host`:[\$PWD] # "
export PS1
Once you have done this and either re-login or just run ". .bash_profile" while in the home folder and you will get the new prompt which I find much better. Example below I execute the bash_profile after I have edited it with "vi", and once the profile is loaded you can see the new prompt, I also updated the oracle environment so when logging in as oracle I get the more user friendly prompt:
root@ip-10-195-23-24:[/root]
$ . .bash_profile
root@dbvaws01:[/root] #
root@dbvaws01:[/root] # su - oracle
oracle@dbvaws01:[/home/oracle] #
# ssh-keygen –t dsa
When executing this command just accept the defaults and press enter; DO NOT enter a passphrase. Once this is done, run the following two commands (as the Oracle Unix account) on both systems, when asked to continue say “yes” and supply the oracle Unix account passwords when prompted:
# ssh-copy-id -i /home/oracle/.ssh/id_dsa.pub oracle@dbvaws01
# ssh-copy-id -i /home/oracle/.ssh/id_dsa.pub oracle@dbvaws02
Once you have executed the above you should be able to establish ssh connections between the two Instances without passwords. For example, if you execute these commands you should be able to connect without passwords.
## On Primary:
ssh oracle@dbvaws02
## On Standby:
ssh oracle@dbvaws01
As you can see it is nice and easy to do using these two commands, but it does require PasswordAuthentication to be enabled in SSH. There is another option, which is to manually copy the key details into the ~/.ssh/authorized_keys file and this process is explained in detail “here”.
The next step in preparing for the Standby™ installation is creating the base Dbvisit software directory /usr/local/dbvisitand making sure that the Oracle Unix account is the owner. I know everyone prefers to install software into their own location, but I do recommend you make use of the default location of /usr/local/dbvisit. This can be done by doing the following as the root user:
mkdir /usr/local/dbvisit
chown oracle:oinstall /usr/local/dbvisit
One of the most important folders to create is the default ARCHDEST folder. This is the folder where the standby database will be storing the archive logs it is receiving from the primary. It is good practice to ensure that this folder exists on both the primary and standby servers and in the same location. In this example I am using /u01/app/oracle/archive/dbvisit/testdb.
In a real life production system you would put this folder on a filesystem where there is sufficient space and make sure the oracle software owner own this folder. Create this folder on both systems and when running the initial Standby setup configuration, make sure that you specify this folder for the ARCHDEST location.
You can now download and install the latest Standby software and install Standby using the standard installation procedures for Linux. This is a two step process:
1. First download the latest install file and copy it to both the Instances into a temporary folder. I always create a temporary folder in the /home/oracle folder with the version number. I then copy the downloaded zip file into this folder and perform the installation from there. Example:
/home/oracle/6.0.40/dbvisit-standby6.0.40_linux.zip
Now run the initial install on both systems.
cd /home/oracle/6.0.40
unzip dbvisit-standby6.0.40_linux.zip
tar xf dbvisit-standby6.0.40.tar
cd dbvisit
chmod 755 dbvisit_install
./dbvisit_install
2. The second step is to run the initial setup on the Primary server (dbvaws01). This can be done from the command line or via the GUI. From the command line all you need to do, on the primary server, is run as the Oracle Unix account the “dbvisit_setup” executable which will start the configuration process (which creates the Dbvisit Configuration file - DDC file). Example:
oracle@dbvaws01:[/home/oracle] # cd /usr/local/dbvisit/standby/
oracle@dbvaws01:[/usr/local/dbvisit/standby] # ./dbvisit_setup
When asked if this is the primary server, say yes. And select menu option 1 to start the new configuration process. Important: Make sure you use “dbvaws01” and “dbvaws02” as the names for your primary and standby servers when asked by the setup wizard. For more details please see the online documentation here.
If you want to run the configuration via the GUI, you can access the primary server using your Elastic IP address that you assigned to the primary server. In this example the EIP that was assigned to the primary was 154.243.183.95. The URL to use the GUI would then be:
https:\\154.243.183.95:8443
For more details on the GUI setup please see here.
IMPORTANT: Once you have finished the Standby installation and configuration, make sure you set the HOSTNAME_CMD=/usr/local/bin/dbv_host in your created DDC configuration file. In this example my DDC file was created as /usr/local/dbvisit/standby/dbv_testdb.env
You can use the Standby built-in feature to Create the Standby Database (CSD) on the standby server. This option is available in the GUI under the SETUP menu option or under the command line option 7 when you run "dbvisit_setup". In my case I pre-created the /u01/oradata and /u01/flash_recovery_area folders on the standby server (dbvaws01) as root and then made sure it was owned by oracle before I started the Create Standby database process.
Once you have completed the standby database creation process you you can schedule Standby to run as normal either via the Dbvisit GUI (Dbvserver) scheduler or via the Unix cron schedule. Standby can now be used as normal.
I hope this overview gave you a good idea as to how you can get started in using Standby with Amazon AWS. All the best for this as you try this out for yourself, and please feel free to post your own comments and experiences around this. Enjoy!